Saturday, October 25, 2014

Tennessee Tristar Pumpkin

For Tennesseans, the TN flag is just a classic symbol of their love for this beautiful state. So, I decided to make a tristar pumkin this year. Basically, I got a pumpkin and cleaned it out. Then I traced out the two circles. Then, I slowly but surely chunked out the circle without cutting all the way through. Then, the easiest way to get the stars would be to use a star-shaped cookie cutter. I did not have one, so I made a star on a notecard, cut it out, and traced it onto the punkin. Then I cut out the stars. Also, to cut these things I used the pumpkin carving tools you can get at the store (I got mine at Hobby Lobby).

-H


Monday, May 26, 2014

Boy Meets World Shoes

Hey Y'all!

So I made some Boy Meets World themed shoes! To make your own you will need: white fabric shoes (I bought mine from Target), a variety pack of sharpies (both fine point and regular), a pencil, and a design in mind.

Let's begin!

1.) draw your ideas in pencil to get positioning correct.(If needed, you can practice the sketches on paper first to get it perfect). In the picture mine has already been outlined with black sharpie so that y'all can see it easier. I put quotes on mine, as well as the logo.
2.) Then color in with the regular size sharpies. Beware of bleeding from the sharpies.

3.) Enjoy!


If y'all have any questions or need help with ideas just email me at flapjacksandflannel@gmail.com! I can custom make a pair for you! You can buy a custom pair on our Etsy page: https://www.etsy.com/shop/FlapjacksandFlannel

Saturday, March 29, 2014

Flower Ball


What You'll Need:
Bouquet of Fake Flowers
Styrofoam Ball: pick any size

NOT PICTURED:
Hot Glue 
String/cord/rope
Safety Pin 


First off, I wanna start by saying that fake flowers can be extremely expensive, but the craft stores put them on sale. So, be sure to wait it out and buy the flowers when they are on sale. I got all my flowers for 50% off at JoAnn's this past weekend, so it can be less ridiculous. 

Let's BEGIN! 

To begin, the flowers need to be removed from the stems.


If your flowers are made like the one pictured below with a piece of plastic connecting the flower to the stem, you can just gently pull on this piece away from the stem and the flower will be ready to go. However, if your flowers just directly connect to the stem, you can use wire cutters to cut the flower away from the long stem while still keeping atleast half an inch of stem in order to poke it into the styrofoam. 


Now that I have separated flowers, I began to poke my flowers in the styrofoam. I went all the way around in a line at first keeping the flowers outer edges touching. At this point, I realized I did not have enough of the same flower, so I used some purple flowers that you will see in later pictures to fill the bottom. I left the top part bare. 


I ended up running into another problem. My flowers were falling out of the styrofoam...so........
I turned to my trusty superglue... 


But, that didn't work either, so I turned to my even more trusty hot glue gun. Pull the flower out the the styrofoam. Coat what is left of the stem in hot glue. Then push the flower back into the original hole.


You can stop here and leave it as a table decoration, or you can go on to make it be able to hang from something. 


I took a large safety pin and connected my thread to this safety pin. I then eye-balled a distance in that would still be able to hold the ball without the thread breaking through the styrofoam. So, I pushed the safety pin through the styrofoam ball and tied a knot in the sting making a loop. 


And then all you have to do is hang it up! 


Hope you have enjoyed a little bit of flower power! 

-H

P.S. I am SUPER obsessed with fake flowers right now. So, expect to see a lot of crafts with fake flowers. 


Friday, March 21, 2014

Wedding Anniversary Gift

Hey y'all! So for my grandparents 50th Wedding Anniversary I made them this. It is a 50th Wedding Anniversary penny picture.


What you will need is:
 a big jar of pennies
 super glue
 frame
 stencil
 poster board
sharpie 

Each of the pennies COINcides (see what I did there.haha) with a year of their marriage. So to start you will need to go through a big jar of pennies to find one for each year starting with the year they got married and going all the way through to the present year.


 Next cut the poster board to fit into the frame you bought. Then using the stencil and sharpie, write "HAPPY ANNIVERSARY", there names, and the year if you want. 


Place the pennies in order by year and in the shape of how many years they have been married. Then glue them down and IT IS FINISHED!

Hope this makes your family/ friends very happy! Email with any questions.

-B

Tuesday, March 4, 2014

Bacon Roses

Bacon Roses- for the meat lover in your life.

For this simple gift idea, you'll need:
-Thick Cut Bacon (I made a dozen)
-Fake Roses
-Toothpicks
-Muffin Tin

Preheat oven to 375
Turn on some Ke$ha music (mandatory)

Start out by rolling each strip of bacon into a rose shape. Don't roll it too tight or it won't cook all the way through!

Stick 2 toothpicks through the center to form an "X" with the toothpicks.
I used a mini muffin tin and it was perfect size, but I regular muffin tin would also work. Set the rolled bacon in the muffin tins so they are hovering and don't touch the bottom of the tin.
Other tutorials want you to drill a hole in the bottom of your muffin tin so the bacon grease can drain. NO DONT DO IT!! Why would you do that?? It worked perfectly fine for me to not have it drain. It cooked in the grease, just make sure to watch it carefully and be extra careful when you take it out of the oven.

Put the bacon in the oven at 375 for 30-45 minutes. Watch it carefully! (Make sure to check that it is cooked all the way through)
While the bacon is cooking, take the red petals off of your fake flowers.

Keep the green star shaped part that goes on the underside of the flower on the stem, it will help keep the bacon from sliding down the stem. Push the star shaped piece down a bit so you have a piece of the stem sticking out. You can slide the bacon onto it like a kabob! 

Take the toothpicks out once the bacon has cooled and stick em on the stems!


Ta-da! My next experiment is to make chocolate dipped bacon roses. I'll keep you updated. 
Photo credits go to my super artsy boyfriend who was the grateful recipient of this tasty bouquet. 


Till next time,
K


Thursday, February 27, 2014

Roaming...

What You'll Need:
Modge Podge - I had his weird matte gel medium left over for something else, so I just used that.
Paint
Paint Brush
Wood - I assume a piece of canvas would work too, but I had this piece of wood that I got from JoAnn's but ended up not using.
Map - I found one around our house we would never need, so I used it.
Paint Pen 


Let's Get Down to BUSINESSSS!

Start by modge podging the map to the wood. I modge podged first then cut the excess off, but you can measure and cut it off first if you would like. Just don't forget the edges of the wood or canvas. Then let it dry completely.


Now it is time for some FUN! You can either paint your own foot or someone elses. I considered using my nephew's lil' feet so it would be cute little feet, but I just used my own really awkward feet.

<--Please excuse my super awkward foot.


After you get your foot all painted up, you step onto the piece of wood. 


<---Again, please excuse how extremely awkward my feet are. 


After you get two (or more) foot prints, let them both dry. Then, pick up your paint pen and get started. You can pick any phrase you want, but I personally like "Roam where you want too, Roam around the world." If you need some inspiration for travel quotes, just search travel quotes on pinterest. And yes, I realize that there should only by one "o" on "too," but I like two much better, so whatevs. If you have picked a paint color that is very visible, there is not much need to outline your footprints, but I had picked a light tan that was hard to see, so I outlined the prints.


I wanted to do this because of my recent studying abroad this past semester. Expect to see a whole lot more travel crafts from me. I am semi obsessed lately.
I hope you like it!

-H

Thursday, January 9, 2014

A Dream is a Wish Your Heart Makes

Here is my DIY Dream Catcher!

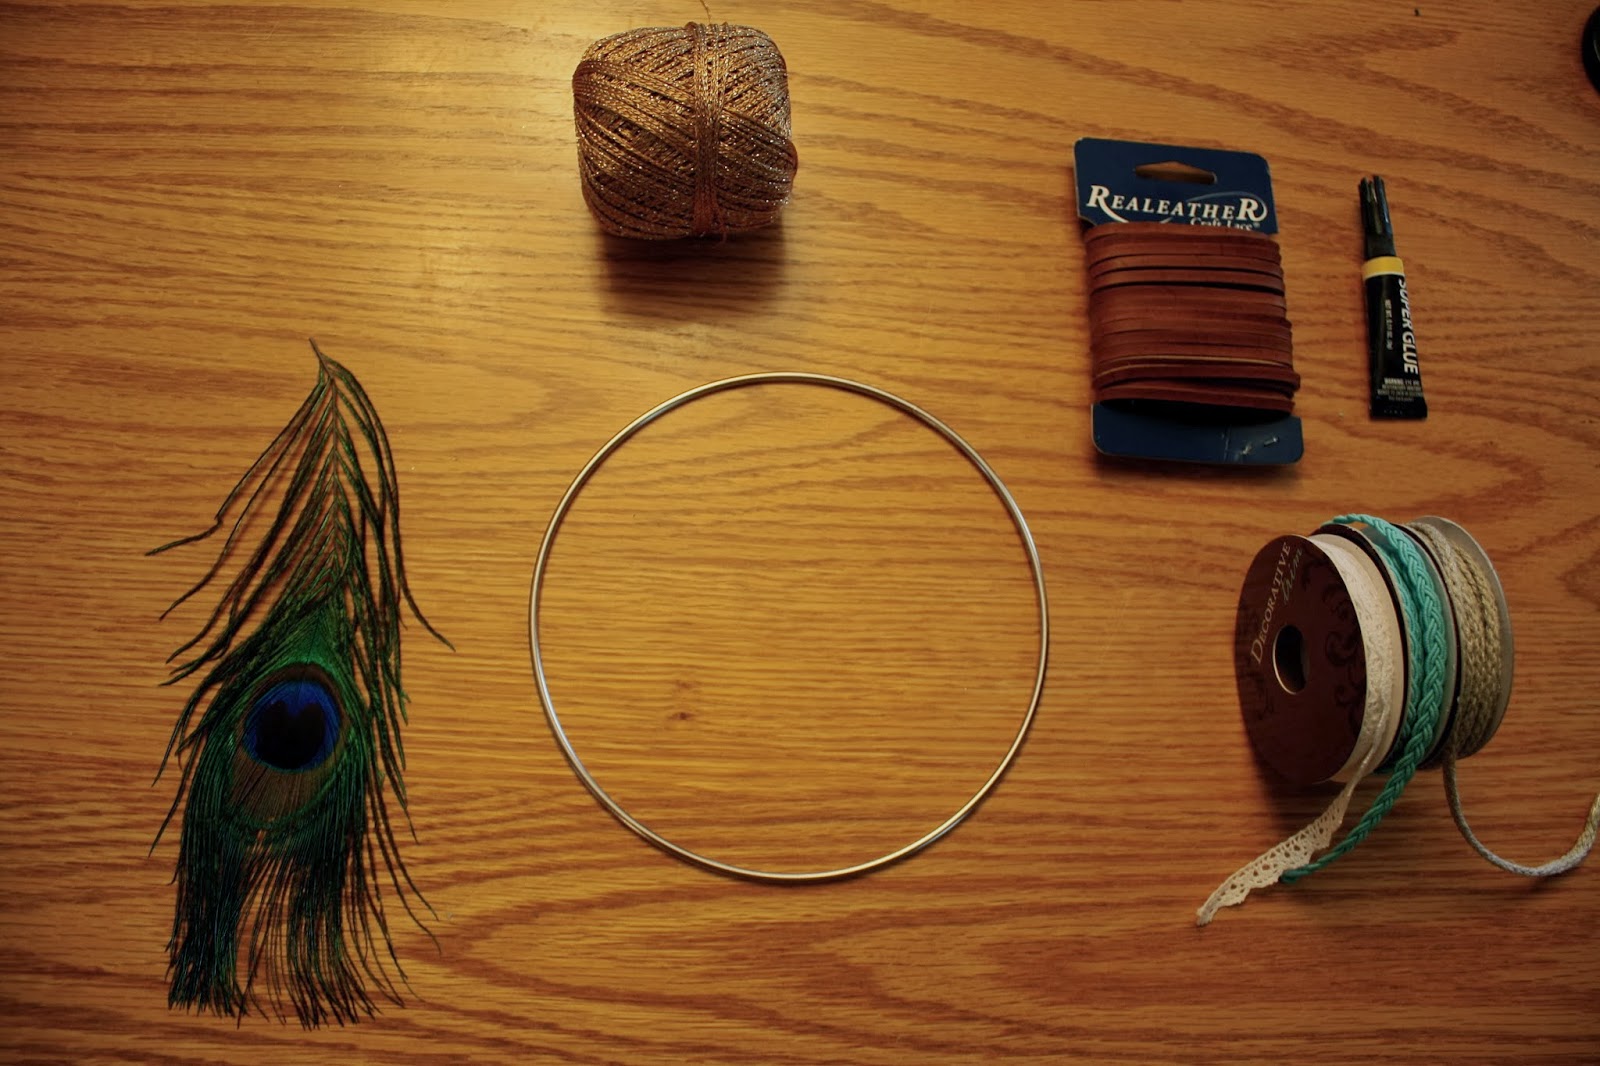
What You'll Need:
Metal Ring (In the "Native American" section of the craft store)
Leather
Thin Thread
Ribbons or Thread to Hang From the Bottom
Hot Glue (yes, super glue is pictured)
Feather (you can find one or buy one or not use one)
* If you want, you can add beads or really anything anywhere on it.


LET'S GET READY TO RUMBLEEEE! (*or to craft whatever)

Begin by cutting strips of the thread you are planning to use.


At first I tried to use super glue, but that didn't work out.
So, I switched to my trusty Hot Glue Gun.
Pretty cute I know.
Please exscuse how gross I look...
<333


Okay, so now that you have your hot glue gun, begin gluing your strips on with a little seperation. The small thread, I just tied on since it is so little.
I went to attach the feather, and I did not like how it looked being such a massive peacock feather, so I cut it down and tied it on to one of the small pieces of thread. I also added a dab of hot glue to make sure it stayed in place. You can do the same thing with any type of feather. Personally, I like the look better when it is hanging down rather than being directly attached to the ring, but it is all personal preference. Once all of the pieces you have chose to leave hanging down are in place, it is time to begin wrapping the ring with the leather. The leather I have pictured above is very stiff and difficult to work with. I suggest getting a Suede Leather that is much thinner and more flexible. It worked much better on a previous dream catcher I had made.
When you are ready to begin wrapping, put some hot glue on the ring at the top and apply the leather to that spot. hold until the hot glue hardens. Then begin wrapping the leather around the ring. The leather will get a little twisted, but untwisting it is not too much of a pain. Once you reach the part where you have connected ribbons, things get a little bit difficult. The thicker the ribbon, the harder it is to wrap around the ring and disguise the ribbon. It is possible to add the ribbons after you have wrapped the metal ring, but with thicker ribbon it is harder to get in between the slots; it really is a bit of a struggle either way. You must wrap in between the spaces you have left between the ribbons and try to cover as much of the metal and top of the ribbon as you can. There may be some slight bumps, but once you are finished it is not very noticeable. You continue wrapping all the way around until you reach the top. You add more hot glue here and secure the final part in space. I then like to tie a knot and make a loop at the top. I used some hot glue to help me make this loop. Now, it is time to begin decorating the center portion.
You start by tying some of the thin thread in between a wrapping of the leather. Then, you just have some fun and create any design you want! I did this by attaching my strings across from each other and tying off this other end. I continued this process tweaking it some until I was happy with the design.


See, I just kept adding more and more until I thought the design looked full and pretty. On these strands, you can add delicate beads to make it look even cooler than it already does.


And eventually, you reach the final project like this!

If you have seen some of the dream catchers with the piece of lace in the center, this can be made the same way, except, when you get to decorating the center, just thread your small thread through holes in the lace and tie around the slits in the wrapped leather. If you use this approach, it will look like this other dream catcher I made from things I found while I traveled abroad this past semester. 

Hope you enjoy and that it is understandable! If you have any questions, just comment. Luh yuh - H

Tuesday, January 7, 2014

Wooden Rocking Chair Tutorial


Okay so if you want to build a super awesome rocking chair from mostly sticks you found in the woods here is a tutorial!

Supplies: (all sticks must be sturdy)
1. at least nine 1inch or thicker sticks (that are longer than 10 1/2 inches long)(these are for the seat so make them the same length)
2. at least six 1 1/2 or thicker sticks (that are longer than 15 inches)(for the middle of the back)(you can make them the same size or leave them different sizes)
3. two 1 1/2 or thicker sticks (that are longer than 19 inches)(for the back legs) (make them the same length)
4. two 1 1/2 or thicker sticks (that are around 10 inches long)(for the front legs)(make them same length)
5. one 1 1/2 or thicker  stick that will span the back of the sticks used as the back part of chair(back brace stick)
6. three sticks 1 inch or thicker that span the total width of sticks used as the base of the seat (make same length)
7. arm rest sticks optional
8. one 2x6x8 lumbar
9. four bolts 3/8x5inch and 3/8 nuts
10. eight 3/8 washers
11. four 3/8 lock washers
12. four 3 inch screws
13. box of 50+ 2 inch screws
14. drill with screw driver, 3/8 drill bit(for countersinking), drill bit that is a little bit smaller than the thickness of the screw you are using
15. sander
16. saw
17. paint scraper
18. four foot long 4 inch dowel
19. two sticks that are the length between the front legs of the chair and the back legs
20. level


Steps:
1. Gather all your sticks from the woods (be careful for thorns).
2. Since the sticks are from outside, you will have to strip off the outside bark of the sticks. I found that using the paint scraper is the easiest way to remove the bark.
3. Next place all the sticks in the arrangement that you want them to be.
4. Take your two sticks that are longer than 19+ inches(#3) and cut them to be the same height.
5. using the 3 inch screws attach those two 19+ inch sticks(#3) to the stick that is the width of the seat of your chair(#6).
6. do the same with the sticks used as the front legs(#4).
7. now attach all the sticks used for the seat(#1) to the sticks used as the base of the seat(#6).

8. attach all of the sticks used for the middle of the back of the seat(#2) in the upright position to the last of the (#6) sticks.
9. attach the ends of the (#6) stick in between the 19+ inch(#3) sticks. place right above the sticks used in the seat.
10. attach the back brace stick(#5) to all the sticks of the back, including the end 19+ inch sticks.

11. attach (#19) sticks between front legs and the back legs.
12.  now is time to cut the rockers. Use the 2x6x8 piece of lumbar(#8) and cut it to be two 3 1/2 feet long, but make sure that you cut it to be an arch so that it will actually rock. use your discretion.
13. stain the rockers if desired.
14. attach rockers to the bottom of the four legs. make sure the legs sit higher than the bottom of the rockers so that it actually rocks back and forth. use level to make sure they are even.
15. attach rockers with the bolts. the order goes end of bolt washer, wood, washer, lock washer, nut.

16. cut wooden dowel (#18) to be two dowels each that will be the length between the two rockers.
17. attach one of the dowels behind the front legs between the rockers and one in front of the back legs.
18. add cushions if desired!


hope this was helpful!
-B

email or comment any questions you may have!
flapjacksandflannel@gmail.com


Kyla

Hey heyyyy! I'm super excited to be starting this blog with my girls. We have this big dream of one day opening a craft and coffee shop, but while we're still in school this blog was the way to start. Obviously we all love crafting! DIY home decor is my favorite type. I'm obsessed with Mason Jars, lace, and fun fabric! If I could major in crafting I would, but Education is pretty darn close.

Some other fun things about me:
Favorite Snack: Anything you can dip in Nutella
Favorite Tv Show: The Bachelor of course
Role Model: Ke$ha
Biggest Regret: The bob I was NOT pulling off in 8th grade. Hairstyles are not my friend.
Biggest Accomplishment: Becoming a regular at Jo-Ann's and Kroger.
I love running, taking naps and last but not least GLITTER.

Last time we had a craft night with Ke$ha she wrote a song about it, "There's a place I know if you're looking for a show where they go hard core and there's glitter on the floor." I'll keep you posted on any future collabs.

Thanks for checking out Flapjacks and Flannel!


Love,
K

Monday, January 6, 2014

Haley

Wasssssup my Witchessss? 

My name is Haley. I like to craft. I really like where I live, so I make a lot of crafts that deal with my state. Uhhhhhhhhm, yes. I do not know what else to say. I am insanely ridiculous as a human as can be seen through this blog. 

Favorite Word? Pickle.
Favorite Animal? Bear. The best creature ever to exist. I want one as a pet.
Major? Dental Hygiene.
Favorite Place? Barcelona, Spain. Park Guell is PERFECT. 
Favorite Food? Anything Mexican. Oh wait, obvi some flapjacks...
How Do I Fill My Spare Time? Netflix. Way way way too much Netflix.
Do I Know Another Language? Why yes, I am somewhat fluent in German. 
Biggest Pet Peeve? When people aren't listening and have to be apart of the conversation so they say "What?" or "Who?" like a billion times. 


So, there is a little sneak peek into my life as a ridiculous young adult. Hope you enjoy all that is to come! 

-H 

Tori

Hello all.

My name is Tori and I have always gone by Tori except one year in second grade when I insisted everyone call me Victoria, because that was my God-given name. That faded and now I'm Tori again. My favorite crafts include knitting ferret beds and cozies for my troll doll collection. No, in reality I'm a graphic design major, so I like doing artsy things! I really like embroidering, multi-media, and re-purposing. I'm not great at knitting, but I grind away at the needles anyway. It's a labor of love.

Favorite Book: Harry Potter, no doubt
Favorite Cheese: Gruyere
My Dream: Own a letterpress studio
My tombstone will say: "Big hair, bigger heart."
Favorite Band: The Avett Brothers
Guilty Pleasures: Mermaids, biscuits, the word 'swag', turtlenecks
Sad fact: I avoid most animals
Favorite movie: "O' Brother, Where Art Thou"
My Motto: If you like it, who cares what anyone thinks??
Life is: Sweet tea

I don't know how much of me you will see this semester since I am leaving for GREECE to study abroad for three months, but I will try my hardest to post now and again! Otherwise, I leave you in the firm, but sweaty hands of these three. :)

-T