Showing posts with label Brittany. Show all posts

Saturday, August 26, 2017

BECOMING AN ADULT: DIY College Lamp to Adult Life


So I don't know if you are anything like me, but after college I had a lot of stuff that was great for a dorm room, but not so great for an apartment or house. Like this lamp for example.

 
I got this lamp from Wal-mart for like 10ish bucks. It screams college student! After graduating, I wanted to become more adult in my decor choices. So I decided to sell the lamp above and buy a new one. But DANG lamps are expensive! I can't afford a crazy expensive lamp, I just graduated. After coming to the gruesome realization that I would have to keep my college lamp or live in the dark, I came up with a way to make my lamp transition with me from college to adulthood. Here is how I did it!

Supplies:
  • Black Lamp
  • Rag
  • Gold Spray Paint (the kind that mimics a gold metal)
  • Black Acrylic Paint
  • Water
  • Painters Tape
Additional/Optional Supplies:
  • Fake Succulents
  • Macrame String
  • Wooden Beads
Steps:

  1. Clean off all the dust and gunk from your lamp (don't lie we all know ya lamp is nasty)
  2. Remove the "shades" (whatever those things are that surround the light bulb...I don't know what it is called).
  3. Now you have two options for step three. It depends on the final look you want to achieve. So if you want a more spotty, antique, brassie look follow step A. If you want a more updated industrial look follow step B.
A. Spray paint the entire lamp, including the shades, a solid gold. Allow time to dry. Then take the black acrylic paint and mix it with water. I would say 3/4 water to 1/4 acrylic paint. Dip the rag in the paint/water combo and rub across the spray painted area. This should create that spotty antique look. If the spots aren't as dark as you would like them to be, add more paint to your paint water mixture. You may want to test different stroke patterns to see which you like best, but I had the most luck by wiping the rag all the way across the surface and then lightly dabbing the areas I had just wiped. But make it however you would like it to look because it isn't going in my house. 

B. If your lamp was not black to begin with, paint it all black. If it is already black, paint the lamp shades solid black using the black acrylic paint. Allow time to dry. Then, lightly spray paint the lamp gold allowing the black to shine through. This should give it a rough textured industrial look. 


Here are what the two different methods will get you:


Additional steps:
  1. Add the fake succulents to the base of the lower lamp (as seen in photo at the top)
  2. Add a macrame piece or yarn of any kind in strips to cover the lower flexible rod.

Hope this helped take you one step closer to successful adult-ing.

-B


Monday, May 26, 2014

Boy Meets World Shoes

Hey Y'all!

So I made some Boy Meets World themed shoes! To make your own you will need: white fabric shoes (I bought mine from Target), a variety pack of sharpies (both fine point and regular), a pencil, and a design in mind.

Let's begin!

1.) draw your ideas in pencil to get positioning correct.(If needed, you can practice the sketches on paper first to get it perfect). In the picture mine has already been outlined with black sharpie so that y'all can see it easier. I put quotes on mine, as well as the logo.
2.) Then color in with the regular size sharpies. Beware of bleeding from the sharpies.

3.) Enjoy!


If y'all have any questions or need help with ideas just email me at flapjacksandflannel@gmail.com! I can custom make a pair for you! You can buy a custom pair on our Etsy page: https://www.etsy.com/shop/FlapjacksandFlannel

Friday, March 21, 2014

Wedding Anniversary Gift

Hey y'all! So for my grandparents 50th Wedding Anniversary I made them this. It is a 50th Wedding Anniversary penny picture.


What you will need is:
 a big jar of pennies
 super glue
 frame
 stencil
 poster board
sharpie 

Each of the pennies COINcides (see what I did there.haha) with a year of their marriage. So to start you will need to go through a big jar of pennies to find one for each year starting with the year they got married and going all the way through to the present year.


 Next cut the poster board to fit into the frame you bought. Then using the stencil and sharpie, write "HAPPY ANNIVERSARY", there names, and the year if you want. 


Place the pennies in order by year and in the shape of how many years they have been married. Then glue them down and IT IS FINISHED!

Hope this makes your family/ friends very happy! Email with any questions.

-B

Tuesday, January 7, 2014

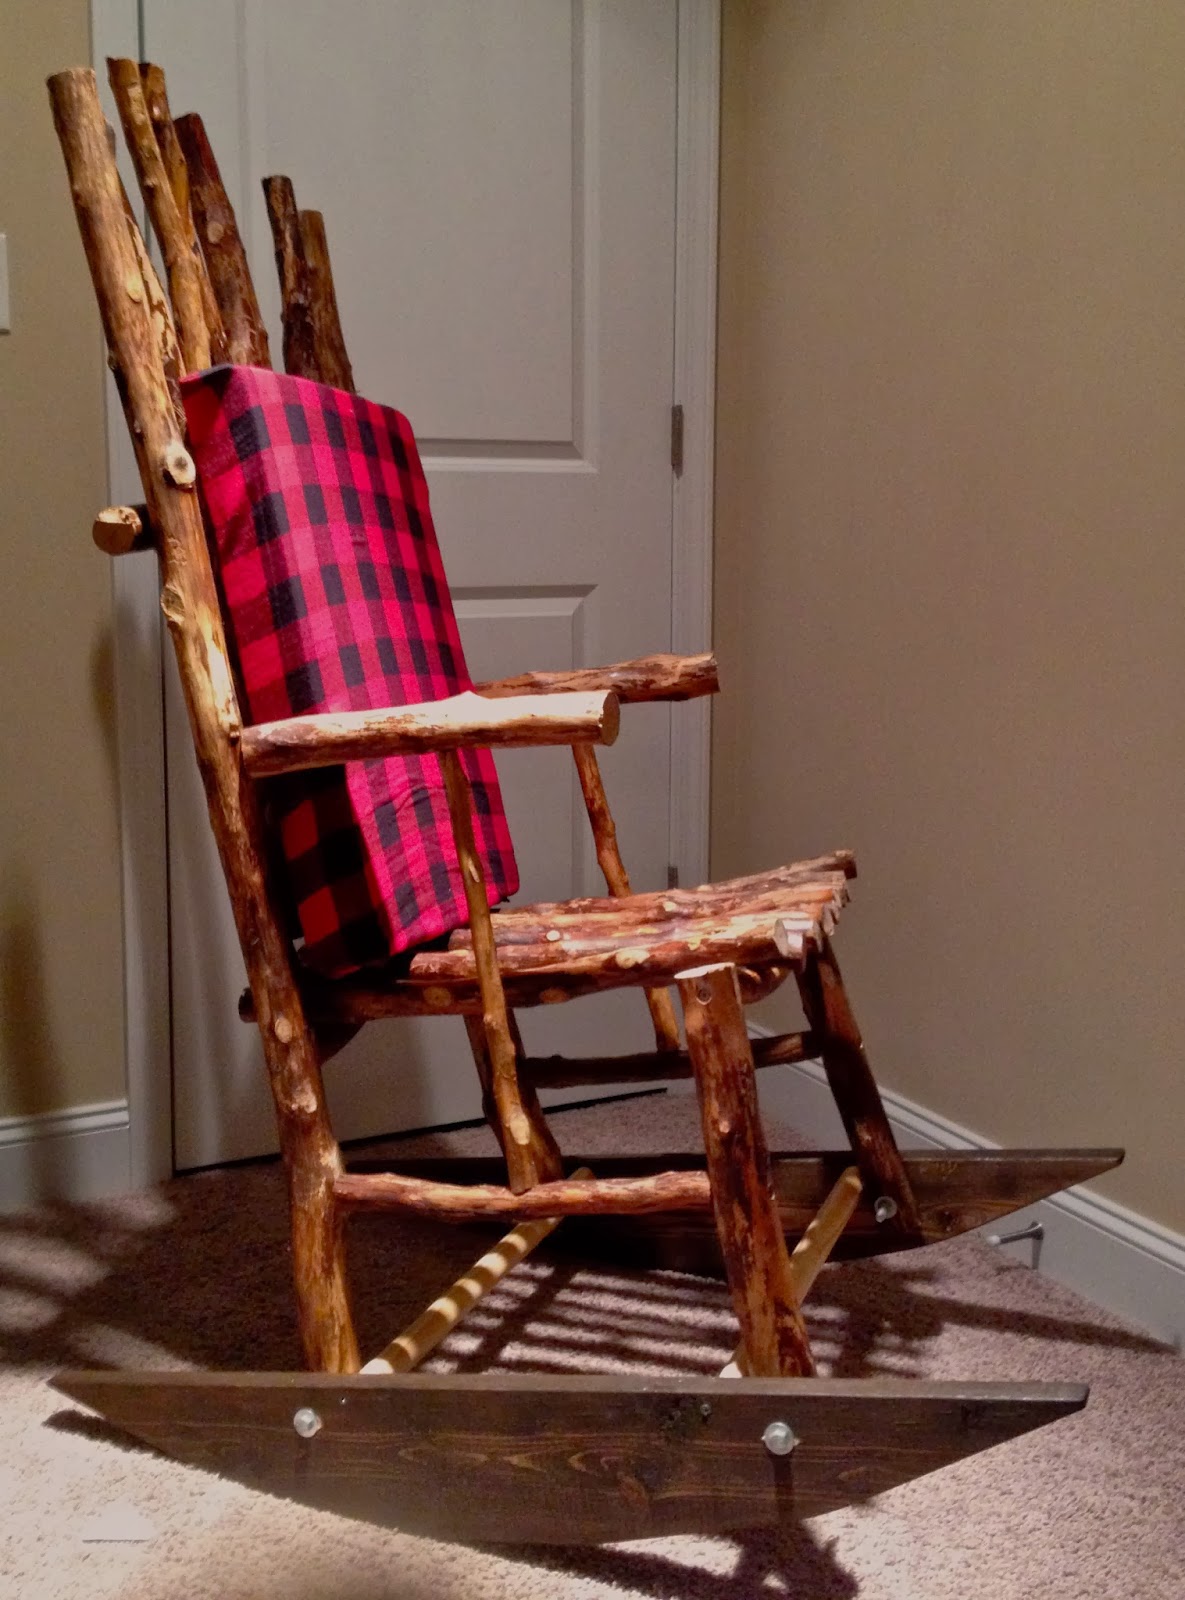
Wooden Rocking Chair Tutorial


Okay so if you want to build a super awesome rocking chair from mostly sticks you found in the woods here is a tutorial!

Supplies: (all sticks must be sturdy)
1. at least nine 1inch or thicker sticks (that are longer than 10 1/2 inches long)(these are for the seat so make them the same length)
2. at least six 1 1/2 or thicker sticks (that are longer than 15 inches)(for the middle of the back)(you can make them the same size or leave them different sizes)
3. two 1 1/2 or thicker sticks (that are longer than 19 inches)(for the back legs) (make them the same length)
4. two 1 1/2 or thicker sticks (that are around 10 inches long)(for the front legs)(make them same length)
5. one 1 1/2 or thicker  stick that will span the back of the sticks used as the back part of chair(back brace stick)
6. three sticks 1 inch or thicker that span the total width of sticks used as the base of the seat (make same length)
7. arm rest sticks optional
8. one 2x6x8 lumbar
9. four bolts 3/8x5inch and 3/8 nuts
10. eight 3/8 washers
11. four 3/8 lock washers
12. four 3 inch screws
13. box of 50+ 2 inch screws
14. drill with screw driver, 3/8 drill bit(for countersinking), drill bit that is a little bit smaller than the thickness of the screw you are using
15. sander
16. saw
17. paint scraper
18. four foot long 4 inch dowel
19. two sticks that are the length between the front legs of the chair and the back legs
20. level


Steps:
1. Gather all your sticks from the woods (be careful for thorns).
2. Since the sticks are from outside, you will have to strip off the outside bark of the sticks. I found that using the paint scraper is the easiest way to remove the bark.
3. Next place all the sticks in the arrangement that you want them to be.
4. Take your two sticks that are longer than 19+ inches(#3) and cut them to be the same height.
5. using the 3 inch screws attach those two 19+ inch sticks(#3) to the stick that is the width of the seat of your chair(#6).
6. do the same with the sticks used as the front legs(#4).
7. now attach all the sticks used for the seat(#1) to the sticks used as the base of the seat(#6).

8. attach all of the sticks used for the middle of the back of the seat(#2) in the upright position to the last of the (#6) sticks.
9. attach the ends of the (#6) stick in between the 19+ inch(#3) sticks. place right above the sticks used in the seat.
10. attach the back brace stick(#5) to all the sticks of the back, including the end 19+ inch sticks.

11. attach (#19) sticks between front legs and the back legs.
12.  now is time to cut the rockers. Use the 2x6x8 piece of lumbar(#8) and cut it to be two 3 1/2 feet long, but make sure that you cut it to be an arch so that it will actually rock. use your discretion.
13. stain the rockers if desired.
14. attach rockers to the bottom of the four legs. make sure the legs sit higher than the bottom of the rockers so that it actually rocks back and forth. use level to make sure they are even.
15. attach rockers with the bolts. the order goes end of bolt washer, wood, washer, lock washer, nut.

16. cut wooden dowel (#18) to be two dowels each that will be the length between the two rockers.
17. attach one of the dowels behind the front legs between the rockers and one in front of the back legs.
18. add cushions if desired!


hope this was helpful!
-B

email or comment any questions you may have!
flapjacksandflannel@gmail.com


Monday, January 6, 2014

Brittany

B: well... I am the first to post a little bit about myself. So this is kind of awkward, but you will learn that it is just who I am: awkward. In the crafting world I am the inventive one of the group. In other words I make things work. My favorite type of crafting is wood working. My friends told me that in this "about me" thing I am supposed to ask myself questions, so here goes....

Q: What is your Favorite tv show?
A: Boy Meets World
Q: What is your Favorite movie?
A: The Perks of Being a Wallflower
Q: What is your Favorite book?
A: Simple, The Bible
Q: What is your Favorite color?
A: Gray
Q: What is your Favorite food?
A: Steak and Potatoes
Q: Tell us a random fact about yourself?
A: I love flannel
Q: What is your weakness?
A: wood carving. It only took a trip to the emergency room to figure it out!

So I hope you all enjoy reading about my awkward life and I hope you continue to read all of my blog posts for a whole lot of awkward with a dash of crafting.

-B